25th Anniversary

25th Anniversary

Wednesday, May 18, 2011

UDI’s Wonderfully Wicked Wednesday Challenge Week 11—Yellow Brick Road

Welcome to another Wonderfully Wicked Wednesday Challenge! 

This card went through several transformations. In keeping with this Month’s Yellow Brick Road Theme, I was trying to think of things Dorothy and her friends encountered along the way, and I thought of the dark forest full of “lions and tigers and bears!” I thought this piece of Woodland Walk DSP was green enough to represent the land of Oz, and the circles reminded me of the dense foliage of the forest.  They also made me think of those cartoons where you see scary eyes glowing in the dark woods. So I laid a Greenhouse Gala road down through the middle of that dark forest. Then I thought about the Cowardly Lion and his quest for courage, and I used my Garden Green Stampin Write Marker to ink that word in my “Hero” Jumbo Stampin’ Around Wheel.

I had a hard time thinking of what to balance it out with.  My Beautiful Wings Butterflies just seemed a little too “froo-froo” for the boldness of the Courage stamp, so I finally decided to incorporate a sentiment from the On the Grow set, and added a poppy from the Friends Never Fade set.  I think this will be a nice encouragement card to root for someone who’s facing something with an unknown outcome that’s just a little out of their comfort zone like a job hunt, or a big out-of-state move.

Yellow Brick Road-WWW 11

Here are the tools I used:

Cardstock: Garden Green, Whisper White, Daffodil Delight

Designer Series Paper: Woodland Walk, Greenhouse Gala

Ink: Garden Green, Poppy Parade

Stamp Sets: Jumbo Stampin’ Around Wheel-Hero, Friends Never Fade, On the Grow

Ribbon: 1/4” Grosgrain, Daffodil Delight & Old Olive

Punches: 1-1/4” Circle, 1” Circle

I popped both greetings and the flower with Dimensionals

WWW 11-Inside

Inside I used the Eyelet Border Punch to trim the corners, and stamped the flower from Friends never Fade in Poppy Parade and the background diamonds with a stamp from Grunge Rock in Daffodil Delight.

I hope you enjoyed this week’s challenge card.  Check out the UDI blog to see what the rest of the design team came up with this week!

Wednesday, May 11, 2011

Wonderfully Wicked Wednesday—Week 10


WWW 10--Friends Never Fade

Welcome to Week 10 of UDI’s Wonderfully Wicked Wednesday Challenge. We stick with each theme for a full month, so this is the second week of our Yellow Brick Road theme. I tried to think of things you see along the yellow brick road, and there are actually a lot, but for some reason I’m stuck on poppies again this week. Go fig! Open-mouthed smile

So… Here’s the list of items I used:

Stamp Set: Friends Never Fade

Cardstock: Daffodil Delight, Pumpkin Pie, Whisper White, Poppy Parade

Ink: Poppy Parade

Designer Series Paper: Greenhouse Gala, and Sunny Garden

Accessories: Big Shot, Textured Impressions Perfect Polka Dots and Square Lattice Folders, 3” Circle Die, Scallop Circles #2 Die, Basic Pearls, Itty Bitty Shapes Pack flower punch, Snail Adhesive and Dimensionals

I hope you enjoyed my card this week.  Be sure to drop by the UDI Blog to see what the rest of the design team came up with for the theme this week!

Wednesday, May 4, 2011

Wonderfully Wicked Wednesday—Week 9: Yellow Brick Road

Welcome to Wonderfully Wicked Wednesday! We have a new theme this week based on The Wonderful Wizard of Oz and Wicked, the Musical.  This month’s theme is the Yellow Brick Road, and here’s what I came up with:

WWW 9 - Yellow Brick Road2

I was definitely in an “Oz” groove this week, and ironically, now that we’re out of the circles/gears theme, I’ve finally been inspired to use bubbles!  I thought the greeting from the Word Play stamp set worked really well with this theme.  We have the yellow brick road, guiding us toward home and then we have the poppies representing all of the pretty or shiny things we come across along our way that can distract us from our goal.  Pretty deep, huh? LOL!

Here is the list of ingredients:

Cardstock: Garden Green, Certainly Celery, Whisper White, Daffodil Delight, Bashful Blue, Poppy Parade

Ink: Wild Wasabi, Bashful Blue, Baja Breeze, Marina Mist, Pretty in Pink.

Ribbon: 1/4 “ grosgrain Daffodil Delight

Circle Punches: 2-1/2”, 1/2”, Itty Bitty Shapes Pack, Owl Punch

Accessories: Big Shot, Square Lattice Textured Impressions Folder, Basic Rhinestones

I used snail to adhere the road, and the poppies to the Certainly Celery layer. Then I ran it through the Big Shot in my Square Lattice Folder. 

Then I used dimensionals to pop up some of my bubbles, while using snail for others to give it more of a 3-d effect.  The large bubble is white cardstock, sponged with all the various blues listed above as well as a dash of Pretty in Pink.  I added Rhinestones to a couple of the “O’s” in the sentiment.  The smaller bubbles are punched from Bashful Blue cardstock and sponged the same way. Finally, I tied the ribbon around the top two layers, and I’m done!

I hope you enjoyed this week’s card.  Be sure to visit the UDI Blog to see how the rest of the design team interpreted this month’s theme. Have a great week!

Wednesday, April 27, 2011

Wonderfully Wicked Wednesday—Week 8


Hello, Everyone! Welcome to week 8 of Wonderfully Wicked Wednesday.  It’s the final week of this month’s theme, Mr. Wizards Gears and Cogs.  I was all set to use my cogs punch on the final week, but it jammed and I couldn’t do anything with it. As usual, the amazing SU Demonstrator Support is on the job and rushing me a replacement for it, but It didn’t arrive in time for me to finish my card, so, I’m back to vehicles that contain gears! LOL!

WWW 8

This one is pretty simple, but I used some tools I haven’t used before, so it was fun.  I really like the On the Grow stamp set, and I’m looking forward to working with it more!

Cardstock: Crumb Cake, Rose Red, Pink Pirouette.

Ink: Cherry Cobbler, Soft Suede.

Stamp Set:  On the Grow

Embellishments: Basic Pearls, Hemp Twine, 5/8” Grosgrain Early Espresso Ribbon.

Tools: Color Spritzer, Sponge Dauber, Dimensionals, Snail Adhesive, Itty Bitty Shapes Punch Pack, and of course, my Paper Cutter.

I think it’s pretty self-explanatory, but as usual, if you have any questions, please feel free to ask!  Hope you’re all having a wonderful week, and I’m praying that you’re all staying safe during the crazy weird weather we’re having across the country.

Wednesday, April 20, 2011

Wonderfully Wicked Wednesday #7

Hi, everyone!

For week # 3 of Mr. Wizard’s Cogs and Gears theme, I chose to feature the Loads of Love set.  After all, there are definitely some gears in there somewhere, right? 

WWW 7 (2)

So I used Tempting Turquoise, Crumb Cake, and Very Vanilla cardstock.

I ran the Very Vanilla piece through the Big Shot with the Elegant Lines Textured Impressions folder and used a Sponge Dauber to highlight embossed parts with Bashful Blue ink. I used a Blender Pen and Pacific Point, Basic Black, Bashful Blue and Cherry Cobbler inks to color in the truck and the trailer (I thought the card needed an extra load of love!) 

I used the Rough Type set (retired) and Early Espresso ink for the greeting on the front, and I crumpled the cardstock and sponged it with more Early Espresso ink before adhering it to the card.  Then I added two small Eyelets with my Cropadile and tied a piece of Hemp Twine (one strand separated) through the holes.  It’s hard to tell in the picture, but I popped the truck and trailer on Dimensionals.

Inside, I added a layer of Very Vanilla and edged the sides with the Eyelet Border punch. The stamp is from Loads of Love and is stamped with Early Espresso ink.

WWW 7 (1)

I hope you enjoyed this week’s challenge.  Be sure to check out the UDI Blog to see what the rest of the design team came up with!

Wednesday, April 13, 2011

UDI-Wonderfully Wicked Wednesday Week #6


IMG_1562

Hi, everyone! It’s Week 6 of Utah Divas International’s Wonderfully Wicked Wednesday, which uses as its themes elements from The Wonderful Wizard of Oz and the musical, Wicked.  Themes last for an entire month, giving us opportunity to fully explore the possibilities.  This is the 2nd week of the Mr. Wizard’s Cogs and Gears theme, and I mixed two sets: A Sense of Time, and Plane and Simple.

Here’s what I used:

Cardstock: Naturals Ivory, Crumb Cake, Early Espresso

Ink: Basic Black, Early Espresso, Sahara Sand, More Mustard

Embellishments: Antique Brass Eyelets, Linen Thread

Adhesives: Snail, Dimensionals

Tools:  Cropadile, Sponge Dauber

I  crinkled the crumb cake layers and used a sponge dauber to sponge early espresso ink around the edges and across the folds. I stamped the clock hands in basic black and popped them up with dimensionals, and the plane is early espresso ink on crumb cake, but now I’m thinking I should have stamped it in basic black to match the clock hands and the greeting. I used dimensionals on the greeting and the plane, too, and I lightly sponged early espresso around the edges and across the ivory piece everywhere except the clock face. I think it makes an interesting blend of past and present to go with the greeting.

I hope this has inspired you to make your own wonderfully wicked creations! Have a great week everyone!

Wednesday, April 6, 2011

Wonderfully Wicked Wednesday, Week #5

Hi, all!  It's time for Week #5 of  UDI's Wonderfully Wicked Wednesday Challenge.  This week begins a new theme:  Mr. Wizard's Gears and Cogs.  This is one of the photos we had for inspiration:

and here's what I came up with:

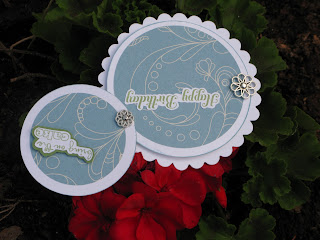
It's a variation on some of the "swivel" cards I've posted in the past where the front swivels up instead of swinging open. In deference to our theme for April, this one, has a few more moving parts...

So here is the list of supplies I used. This was pretty simple to make using the Big Shot.

Ink: Wild Wasabi
Cardstock: Whisper White, Wild Wasabi
DSP: Elegant Soiree
Big Shot Dies: Scallop Circle, Clear Circle, 3.5" Circle, 3" Circle
Punches: 2-1/2" Circle, Large Scallop Circle, 1-3/4" Circle, 1-3/8" Circle
Stamp Sets: Word Play, With All My Heart, Bring on the Cake
Embellishments: Filigree Brads, Metallic Brads
Adhesives: Snail, Dimensionals

So, as I said, this was really pretty simple to make. The trick is to punch the holes while it's closed so that you make sure you're covering up the parts you don't want to show. For instance, the Happy Birthday is actually upside down when everything is closed up, and you don't want the greeting to show under the top circle. Also, mechanically, the 2nd circles from the ends of the string are necessary in order to make sure that the greetings on the end circles remain right-side-up whether the card is open or closed.  I'm really not sure how to explain the rest, so I'll post photos to show you step-by-step how the card opens up, and you can see how everything is layered.  Feel free to contact me if you have any questions!


So there you have it! I had a lot of fun with the theme this week, and I really enjoyed playing with this card.

As you can see by the background, I spent the week gardening because I just couldn't wait any longer, and the flowers and fruit trees are blooming like crazy all around me. So I put out some flowers in the bed outside the kitchen window, and I put a mini vegetable garden in the ground just off the back porch. This morning my mother's hairdresser informed me it's supposed to snow tomorrow... So these photos may be the swan song for my lovely geraniums, not to mention the zucchini and tomato plants, but a girl can hope for spring, right?

Have a great week!