25th Anniversary

25th Anniversary

Wednesday, April 4, 2012

3 x 3 x 3 Gift Box

I’m back!!! After several months of family health issues, I’m finally feeling as though I’m ready to be back in the blogging mode.  I made these cute gift boxes back in December for my sister-in-law, who was hosting her bunco group and wanted some pretty boxes to put her gifts to them in. So I made 10 all with different styles, but all basically the same box. I had some people recently ask for the instructions on how to make them, so here they are.  Feel free to email me if you have any questions about my instructions. They make perfect sense in my head, but I realize not all of you inhabit my head, and that’s probably a good thing!  If you need translation, I’m happy to help!

IMG_2527IMG_2529IMG_2530

Start with a 9 x 9 piece of More Mustard cardstock

Use the Simply Scored tool to make folding/cutting lines at 3” and 6” on two sides. It should look like a tic-tac-toe board when you’re done. Then using the Fiskars cutter (or paper snips), cut in 3” from the edge toward the center on each of the score lines. This should cut off all of the corner squares of your tic-tac-toe board.

Next, take 4 strips of Whisper White cardstock cut 1-1/4” x 3”, and trim the long sides with a scallop border punch. Use the Simply Scored tool to score lengthwise down the center of the strip so it will wrap around the corners to hold the walls of the box in place.

Use Cherry Cobbler ink to stamp the flourish from Elements of Style on each of the walls of the box, then fold the walls up and use Tombow glue to adhere the white strips to each corner, holding each corner for a few seconds to make sure it was dry enough to stay in place.

I lined the inside of my boxes because I knew what I was putting inside would be heavy enough that it would need reinforcement. I dotted a 3” x 3” piece of cardstock (or designer paper) with Tombow glue and dropped it in the bottom of the box. (It may need to be shaved down a bit, but 3 X 3 is a good start point). Then I used a 3” x 12” piece of cardstock (or designer paper), scoring it at 3”, 6” and 9”, dotted it with Tombow glue and pressed it against the insides of the box. Again, the lining is completely optional, and if you’re concerned that it needs the extra reinforcement of another layer of cardstock, you can stamp the cardstock to make it look like designer paper.

To make the lid, use a 4-1/8” x 4-1/8” piece of More Mustard cardstock, and score it at 1” on all 4 sides. Then use paper snips to trim in 1” on the score lines on two opposing sides. Then trim diagonally from the corner to the cut line to leave a triangular flap to glue on the inside and hold the sides together. (Note: You could use the same method to assemble the box if you didn’t want to have the scallop trim on the outside, or conversely, you could trim the flap off the lid and use an oval or a circle to wrap around and hold the sides of the lid together. See the photo of the River Rock box where I used a small oval and eyelets on the lid.)

Stamp the outside of the lid with Elements of Style in Cherry Cobbler ink. Then fold the sides with the gluing flaps to the inside. Dot Tombow glue on the flaps and hold the sides in place for a few moments to keep them straight.

I lined the lid by dropping a 3-1/8” x 3-1/8” square piece of cardstock, dotted with Tombow glue, inside the lid.

Use sticky strip to adhere the scallop ribbon and the pleated ribbon around the sides of the lid. On the top, cut around a circle from the Lace punch in Cherry Cobbler, punch 2 fancy flowers from More Mustard. Wad both of the fancy flowers up to make them pliable, push an Antique Brad through the Lace punch circle and one of the fancy flowers and layer them on top of a large scallop circle punch in Cherry Cobbler. Use sticky strip to layer white Waffle Paper to the back of the scallop circle and use dimensionals to adhere it to the top of the box lid.

I hope you enjoy these boxes.  I had a great time making them! Here are some more photos of the other boxes I made for my sister-in-law. They are all the same box, just decorated differently.  Feel free to contact me if you have any questions about the other decorations. 

Wednesday, September 14, 2011

Wonderfully Wicked Wednesday, #29

Hi, all!  Here is my entry for WWW this week.  I used the new Gently Falling set from the Holiday Mini Catalog.  The theme for this month is Scarecrow, and things to do with autumn.  I thought this looked like the perfect boutonniere for a scarecrow, don’t you?

IMG_2327

I used Soft Suede for the card base, Pool Party for the mat, and Very Vanilla to stamp on.  The background is the “En Francais” stamped in Calypso Coral ink.  It’s hard to tell, but I sponged it with Pool Party ink as well. 

The leaf outlines are stamped in Crumb Cake and the fill-in is stamped in Pool Party. The acorns are outlined in Crumb Cake and filled in with So Saffron. I used a neutral Designer Button tied with linen thread.

The Thank You stamp is from “Day of Gratitude” and is stamped in Soft Suede ink on Pool Party Cardstock.

Hope you enjoyed this week’s card.  Have a great week everyone, and try to get your fingers inky at least once this week!

Wednesday, August 31, 2011

Wonderfully Wicked Wednesday

Welcome! It’s the last week of our Somewhere over the Rainbow theme.  So, I started singing the song in my head and thinking about what you find over the rainbow, and came up with birds, melting troubles, and daring dreams.

Incorporating the bird was easy with our 2-step Bird punch, and Word Play’s “Wish Big” was a natural for daring to dream.  The troubles melting like lemon drops was a little more difficult, and I’m still not completely pleased with them, but I procrastinated too long to have time to tweak it anymore! :) 
IMG_2319

Soooo… Here’s what I used:  I used the Small Oval Punch  and the Calendar Alphabet and Numbers stamp set to make a row of lemon drops spelling out “troubles,” and I used the rain drops stamp from “My Friend” to show them melting away.

I’m still not completely happy with this, and I think I would like it better if I’d used a different color ribbon.  Maybe an orange or a red.  Didn’t have those colors on hand, though, so white it is!

Here’s the complete list:

Cardstock: Tempting Turquoise, Whisper White, Real Red, Tangerine Tango, Daffodil Delight, Lucky Limeade, Pacific Point, Concord Crush, Silver Glimmer Paper

Ink: Real Red, Daffodil Delight, Bashful Blue

Punches: 2-3/8 Scallop Circle, 1-3/4” Circle, Small Oval, Itty Bitty Shapes, Scallop Edge Border

Stamp Sets: Word Play, My Friend, Calendar Alphabet and Numbers, Itty Bitty Bits

Accessories: Sponge Dauber

Wednesday, August 3, 2011

Wonderfully Wicked Wednesday #21

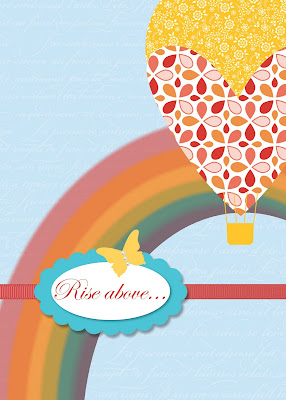
Welcome! I think I've finally recovered from convention brain!  It seems like with all of the swaps to make before convention and all of the sensory overload during convention, it takes awhile to acclimate to regular life again. :)  So this month's theme is Over the Rainbow, and here's what I came up with:


I decided to try out some of the new MDS tricks I learned at convention.  I used a stamp for the basket of the balloon, and a heart punch and a circle punch for the actual balloon.

To make the rainbow, I used a series of circle punches layered behind each other. Each are filled with designer paper, which is then moved outside the punch so that only the drop shadow is left showing.  I moved the shadow to the top left of the punch and copied it for each layer.  The purple layer is the front punch, and I left it filled with the same script designer paper that I used on the card base.

I hope you enjoyed my foray into MDS. Have a great week!

Wednesday, July 13, 2011

Wonderfully Wicked Wednesday—Week 16

I’m off to Stampin’ Up! Convention this week, but here is my entry for the Wonderfully Wicked Wednesday Challenge:

IMG_1868

July’s theme for UDI’s WWW Challenge is “Defy Gravity.” There is no one I can think of who defies gravity more than a cancer survivor.  They defy the gravity of a frightening diagnosis and find the strength to rise up on the wings of hope even when nothing seems hopeful.  With that in mind, I chose to use the Strength and Hope set this week. 

Cardstock: Certainly Celery, Rich Razzleberry, Wisteria Wonder, Very Vanilla

Designer Paper: Pocketful of Posies

Ink:  Rich Razzleberry, Old Olive, Certainly Celery, River Rock.

Punch: Corner Rounder, Itty Bitty Punch Pack

Embellishments: 1/4” Rich Razzleberry Grosgrain, Basic Rhinestones

I stamped the words of comfort stamp across the background first in Certainly Celery and then in River Rock ink.  Then I sponged over the top with Certainly Celery and Rich Razzleberry ink.  I was going for an out-of-focus garden look in the background, but I’m not sure I achieved it. I stamped the Itty Bitty Bits flower and the butterfly in Rich Razzleberry ink and punched the flowers out of Wisteria Wonder.  The “H” stamp is Old Olive ink. I think the rest is pretty self-explanatory, but please feel free to contact me if you have any questions!  I will be at convention all week, but I’ll try to check in when I can.  In the meantime, be sure to check out the Utah Divas International Blog to see what the rest of the WWW design team made this week!

Wednesday, June 29, 2011

Wonderfully Wicked Wednesday!

Welcome to another UDI Wonderfully Wicked Wednesday challenge! This is the final week of the Ruby/Silver Slippers theme, and I spent the morning in the dentist’s office this morning, so I kept my card pretty simple today. 

WWW 15

The Card base is Real Red cardstock, with the background stamp En Francais stamped in Versamark ink and heat embossed with white embossing powder.  I used the Tasteful Trim die to make the Glimmer Paper strips, and the 3” circle die for the black circle.  The white circle was punched with the 2-1/2” circle punch and sponged with Tempting Turquoise ink.  The stamp sets are Full of Life and My Friend, and I used the Owl punch to make the Glimmer Paper heart.

Finally, I used Black 1/8” taffeta ribbon for the bow and popped the circle up with Dimensionals.

I’m going to keep this short today, and go take a nap until the anesthesia wears off and I can feel my jaw again. Open-mouthed smileHave a great week, and be sure to check out the UDI blog to see what the other members of the Design Team came up with!

Wednesday, June 22, 2011

Wonderfully Wicked Wednesday

Welcome to another Wonderfully Wicked Wednesday challenge! This month’s theme is Ruby or Silver Slippers, so I used it as an excuse to pull out the Glimmer Paper and the Brushed Silver cardstock. Add to that some sneak peeks of our new Big Shot die and a new punch, and I really like the way it turned out!
WWW14
I decided to do something a little different with the inside liner. The partial scallop on the right is just the right size for a sentiment stamp from the Teeny Tiny Wishes set.  I haven’t decided who I’m giving this to, so I haven’t stamped it, yet.

Let’s start with the supplies:

Cardstock: Real Red, Whisper White, Brushed Silver
Designer Series Paper: Glimmer Paper
Stamp Set: Grunge Rock
Ink: Real Red
Accessories & Embellishments:  Basic Rhinestones, 1/8” Real Red Taffeta Ribbon, Big Shot, Petals a Plenty Textured Impressions Folder, Tasteful Trim Die, Perfect Pennants Die, Petite Pennants Punch, 1-3/4” Scallop Circle Punch, 1-1/4” Circle Punch. Pewter Metallic Brads, 1/16” Circle Punch, Sponge Dauber, Scallop Circle Die (Inside), Snail Adhesive, Dimensionals, Glue Dots.
I used Real Red cardstock for the base, cut Whisper White Cardstock to 5” x 3.75”, and cut a Brushed Silver cardstock layer at 4.75” x 3.5” before running it through the Big Shot in the Petals a Plenty Textured Impressions Folder.
For the Pendant, I ran a piece of Glimmer Paper through the Big Shot with the Perfect Pennants die to make a circle with scalloped trim around the edge.  I laced the taffeta ribbon through the scallops and held the ends in place with 2 Glue Dots.  Next I used my Grunge Rock stamp set to make my “Real” seal of approval, and punched it with the 1-1/4” Circle punch. I sponged the edges of the circle, added a Brushed Silver Scallop Circle to the back and layered them both on the Glimmer paper circle before attaching the pendant to the card with Dimensionals.
I stamped the diamond background stamp in Real Red ink on Whisper White cardstock, and punched out the smaller Petite Pennants.  Punched holes in the top corners with my 1/16” circle punch, attached them to each other with Brads and used Glue Dots to adhere them to the card.
For the bottom border, I ran a piece of Glimmer Paper through the Big Shot with the Tasteful Trim die, and cut the scallop strip to fit across the Brushed Silver cardstock.
Finally, I added a strip and a half of the Basic Rhinestones across the border and 2 individual Rhinestones to the Pendant.
Inside, I used the Scallop Circle die to cut a piece of Whisper White cardstock for a liner.  It doesn’t fit completely, so I trimmed about 3/4” off and offset it a bit to look like 2 gears. Then I punched some larger Petite Pennants from the edges of the leftover diamond patterned cardstock and sponged the edges for the left side.
I hope you enjoyed my card for this week’s challenge.  Be sure to stop by the UDI Blog to see what the rest of the Design Team came up with!